sparrowdesk-logo-transparent-1.png
Go to sparrowdesk.com
Home
SparrowDesk Overview
  • Overview of SparrowDesk
  • Feature Overview in SparrowDesk
  • SparrowDesk Glossary
Getting Started
  • Setting Up Account Details
  • Default Business Hours
  • Understanding and Creating Teams
  • Inviting Team Members to the Platform
  • Roles and Permissions
  • Single Sign-On
  • Brands in SparrowDesk
  • Getting Started FAQs
  • Use a custom domain for your support portal
  • Customize Customer Email Notifications
Inbox
  • Understanding the Inbox in SparrowDesk
  • Managing Custom Views in Inbox
  • Live Chats in Inbox
  • Staying on Top of New Messages from Customers
  • Conversation Fields in SparrowDesk
  • Merging Conversations in SparrowDesk
  • Round Robin assignment explained
  • Export Conversations as CSV
  • Bulk update fields
  • Forward a Conversation to an External Contact
  • Common Email Delivery Errors
  • Add Watchers to a Conversation
Channels
  • Slack as a Channel
  • WhatsApp as a Channel
  • Facebook Messenger as a Channel
  • Setting Up Email as a Support ChannelConnect your custom email address How do I send and receive emails via SMTP and IMAP ? How do I find my SMTP/IMAP server address and port number? Common Errors while Connecting through SMTP/IMAPHow to Prevent Emails From Going to Spam Email Signatures
  • Installing Chat Widget Chat Widget Installation on WordPressInstall the Chat Widget on ShopifyCustomising Chat WidgetEmbedding and Configuring the SparrowDesk Chat WidgetChat Widget SettingsWhy End Users Don’t Always See Their Chat HistoryTrack page visits in SparrowDesk
Contacts
  • Contacts in SparrowDesk
  • How to manage contact segments
  • Deleting and Blocking Contacts in SparrowDesk
  • Contact Fields in SparrowDesk
Reports
  • Conversation Report
  • Team Performance Report
  • Understanding the AI Agent Report in SparrowDesk
  • Viewing CSAT reports in SparrowDesk
  • Reports FAQ
  • Exporting Reports as PDF
  • Help Center Reports
Automation
  • Macros
  • Business Hours
  • Service-Level Agreements (SLAs)
  • Setting up CSAT (Customer Satisfaction) in SparrowDesk
Zoona AI
  • AI Suggested replies in your Inbox
  • AI-Generated Chat Subjects
  • Zoona AI Knowledge Improvements
  • Introduction to AI AgentAI Agent - Configure PersonaTraining your AI AgentZoona AI Agent CommandsAI Agent - Deploying on chatAI Agent - Deploying on EmailHow to Create a Command Zoona AI Agent - FAQUnderstanding AI resolutions in SparrowDesk
Workflows
  • Automate repetitive tasks through Workflows
  • How to Create a Workflow
  • Workflow Blocks Library
  • Notify a Slack Channel from a Workflow
Help Centre
  • Write Knowledge Articles for your Help Centre and AI Agents
  • Setting Up and Customizing Your Help Center
  • Use a Custom Domain for Your Help Center
  • Make Your Help Centre Discoverable in Search results
  • Adding Google Tag Manager to your Help Center
  • Creating a Ticket Form Setting up Customer Portal
Billing
  • How does SparrowDesk pricing work?
  • What is Seat ?
  • Manage your Billing and Invoices
  • About Sales Tax
  • How to cancel your subscription
  • Frequently Asked Questions
  • AI Co-pilot and AI Resolution billing
  • SparrowDesk Startup Program
Apps and Integrations
  • Okta Integration
  • HubSpot Integration
  • SurveySparrow Integration
  • Zapier Integration
  • Attio Integration
  • Linear Integration
  • Jira Integration
  • Gmail Integration
  • Notion Integration
  • Shopify Integration
  • Migrating from Freshdesk
  • Zoho CRM integration

Bulk update fields

Timer2 min read
A
Arati

Bulk field updates let you apply changes to multiple conversations at once across status, assignee, tags, notes, and more, without opening each one.

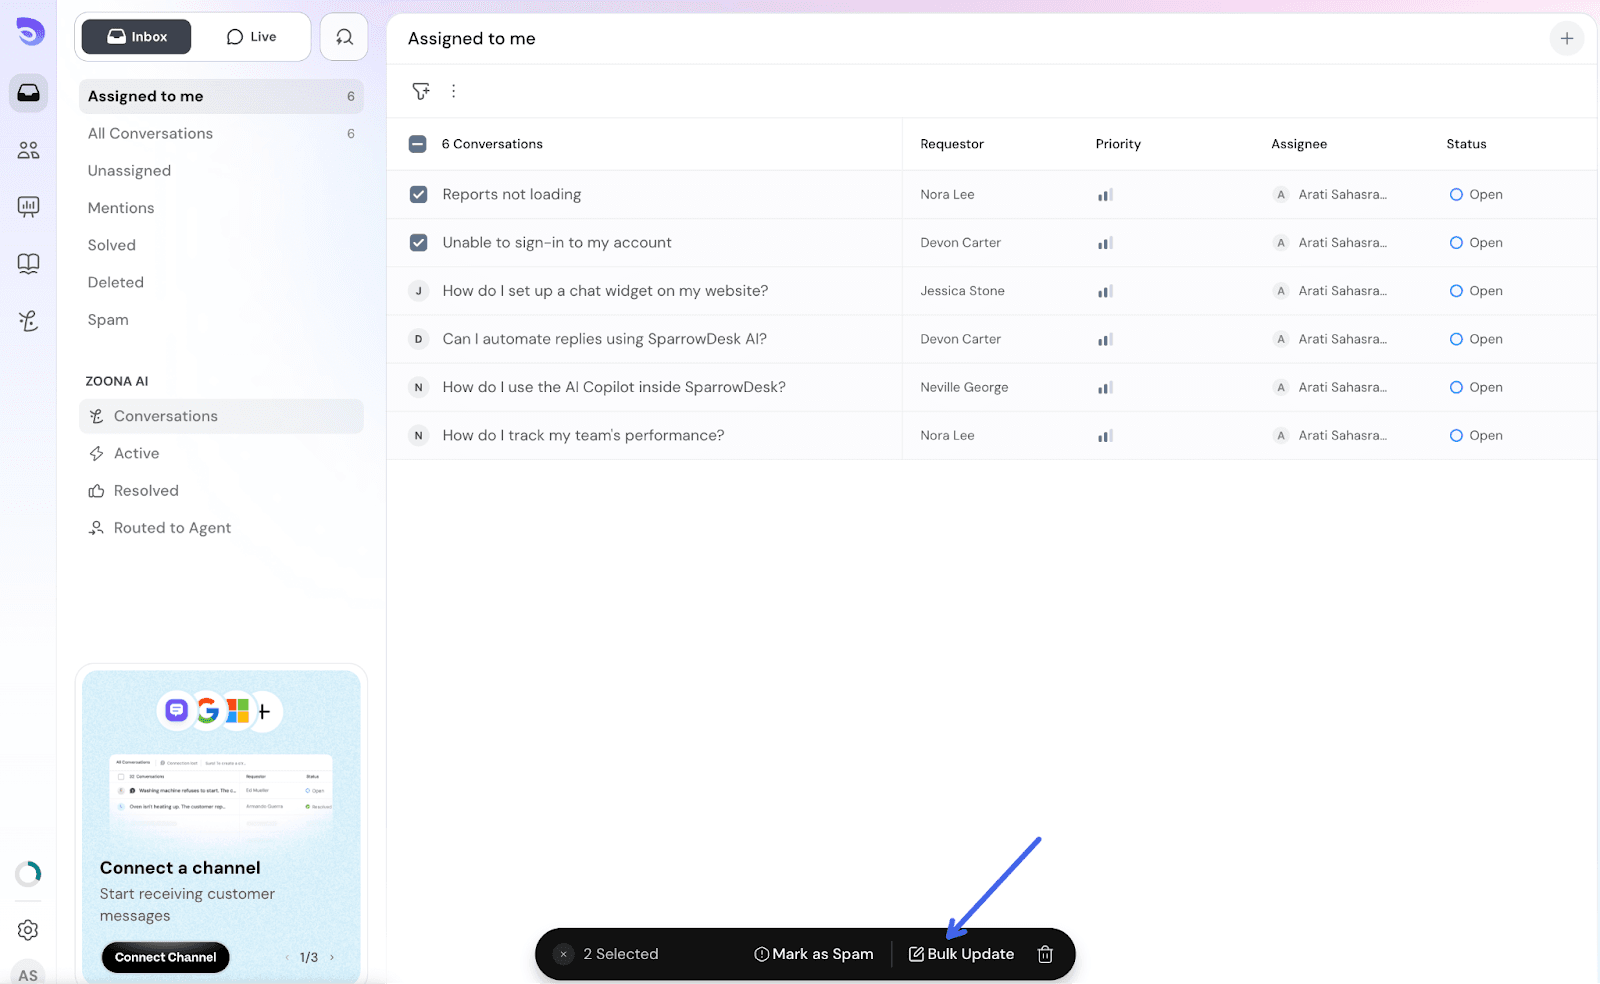
How to select conversations to bulk update?

  1. Go to your Inbox or any filtered view.
  2. Select the conversations you wish to update at once by clicking on the checkbox against them
  3. Click on Bulk update

Image


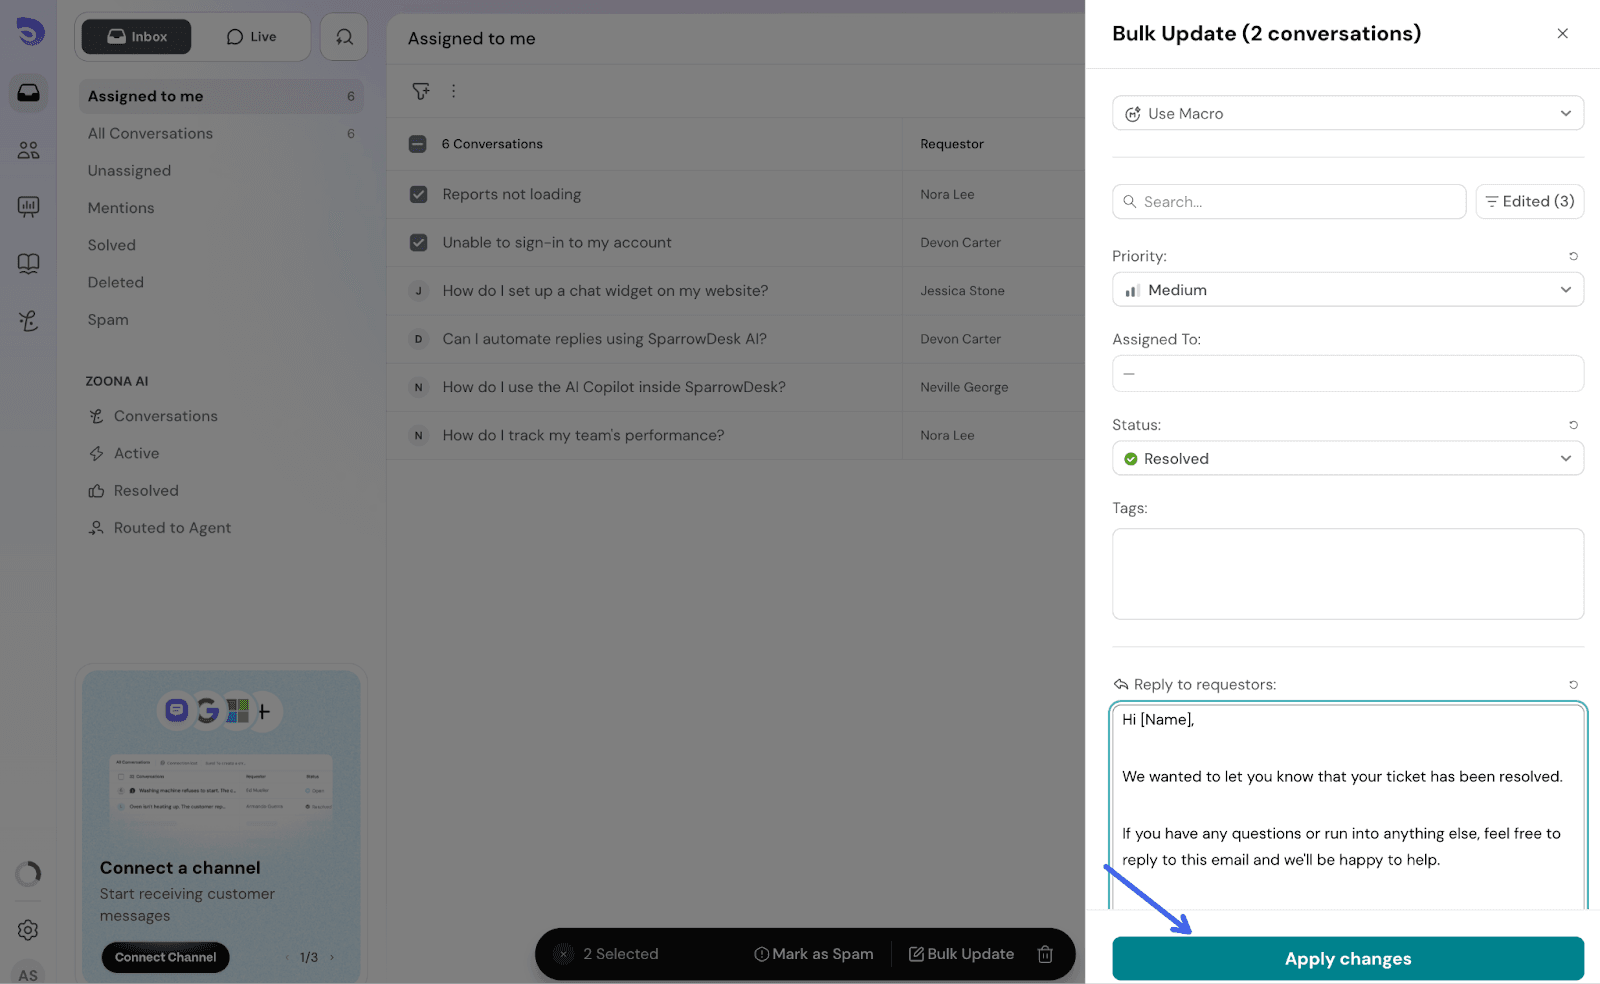
How to apply a bulk field across selected conversations?

Once you have selected your conversations, 

  1. Click Bulk Update in the action bar. A panel opens on the right.
  2. Select the fields you want to update: Status, Assigned To, Priority, Tags, or any custom fields.
  3. You can also bulk Reply to requestors or write an Internal note 
  4. Click Apply changes to confirm

Image

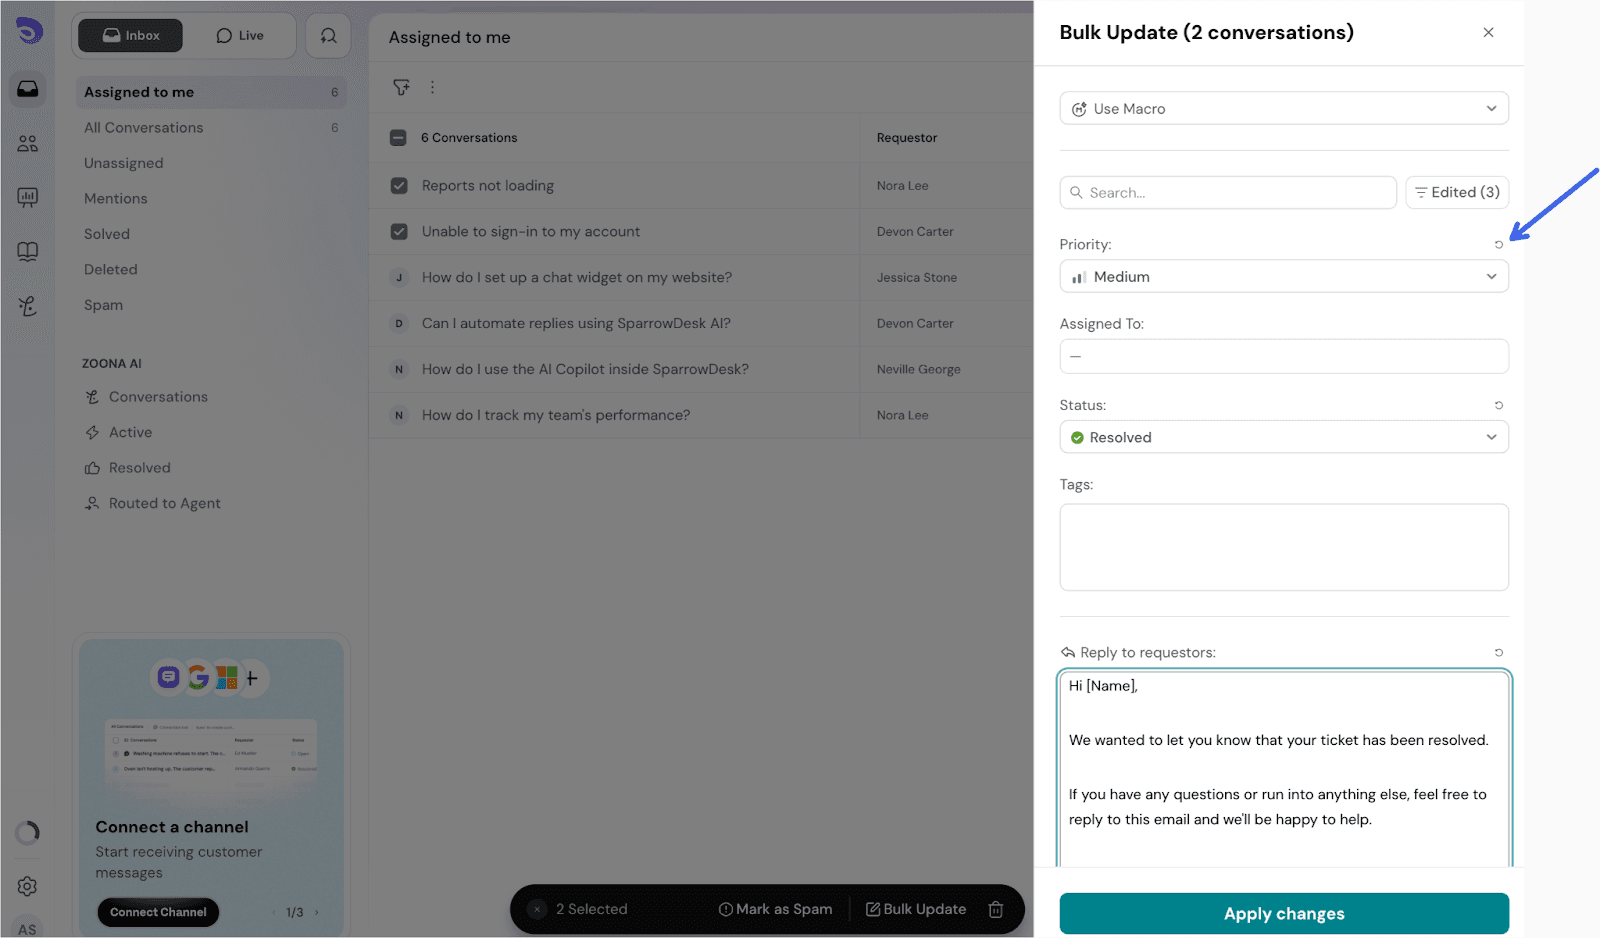
NOTE: If you wish to undo a change before saving, hover over ↻ button next to the field and click it to revert.
Image


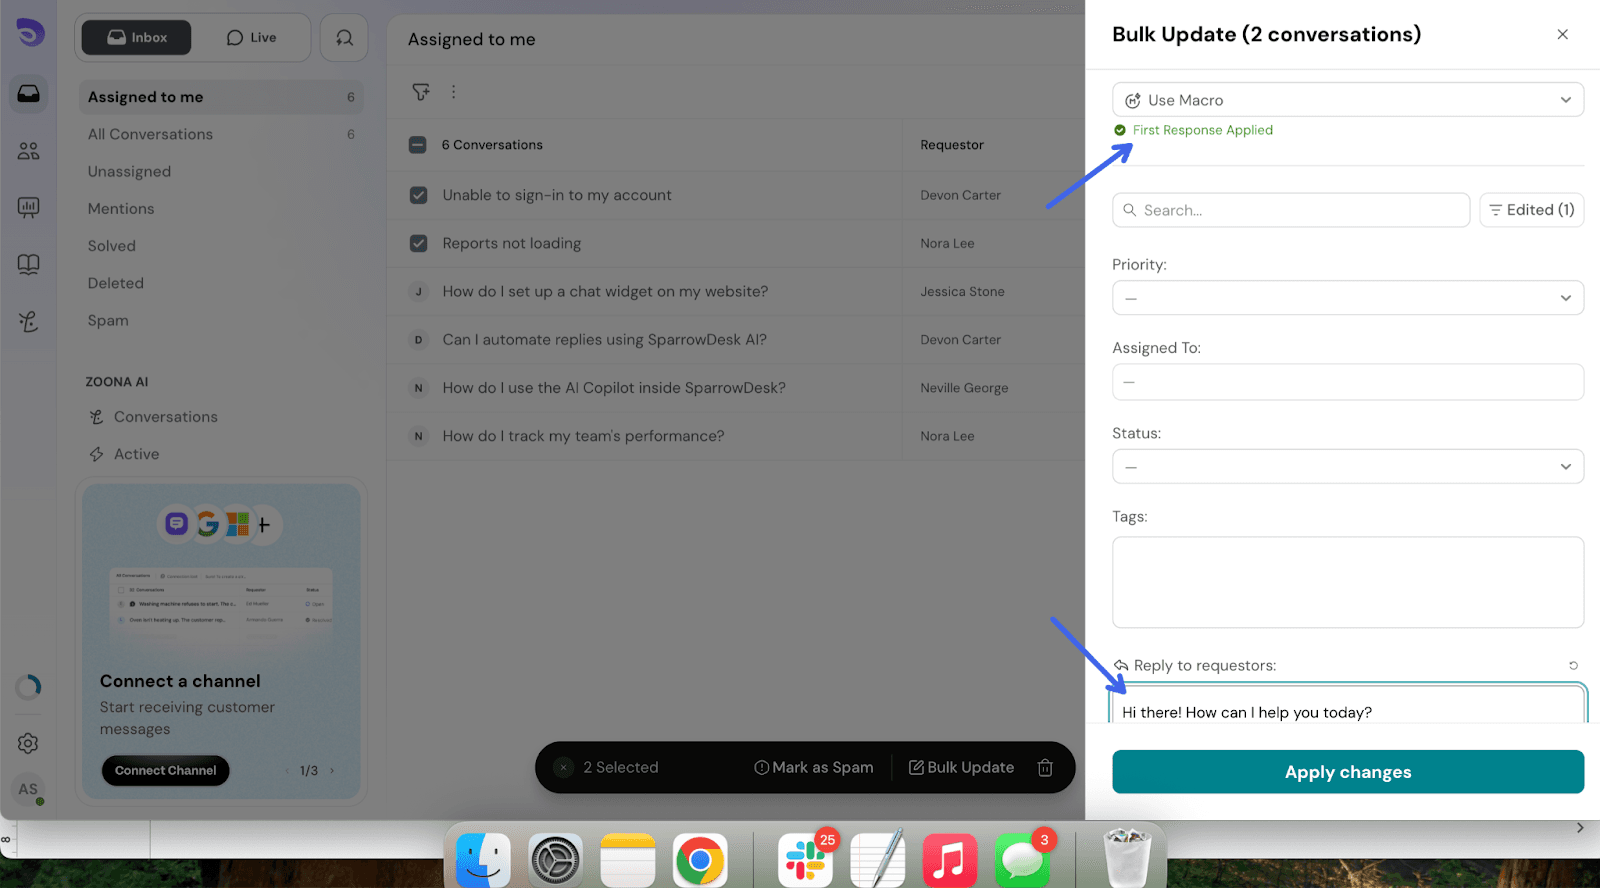
How to apply a Macros rule in bulk?

You can also apply a macro to all selected conversations at once.

Macros are saved sets of actions such as custom response, assign agents, or apply tags the moment a macro is used in one click. This is useful when the same sequence of changes applies to many conversations.

Here's how you can apply a macro in bulk.

  1. At the top of the panel, you'll see a Use Macro option.
  2. Select a saved macro rule from the dropdown to apply it across all your selected conversations at once.
  3. Click Apply changes to confirm

Image


FAQs

Can I undo a bulk field update?
Changes apply immediately after you confirm. If you need to revert, you have to update the affected conversations manually, so use the review step to double-check before applying.

What if some conversations have required fields missing when I try to close them?
SparrowDesk flags those conversations in the review screen. You can fill in the missing fields before confirming, or deselect those conversations and apply the update to the rest.

Does a bulk reply send a separate message to each customer?
Yes. Each customer receives their own reply. They do not see that the message was sent to other conversations.

Can I bulk update conversations across different inboxes?
You can select conversations from any view visible to you. The fields available to update depend on what is configured for each inbox, so some fields may not apply to all selected conversations.

Who can use bulk field updates?
Any agent with permission to edit the fields in question. Admins can update all fields. Agents can only update fields their role allows. Restricted fields will not appear in the update panel.


Powered By SparrowDesk

Table of ContentsOn this page