sparrowdesk-logo-transparent-1.png
Go to sparrowdesk.com
Home
SparrowDesk Overview
  • Overview of SparrowDesk
  • Feature Overview in SparrowDesk
  • SparrowDesk Glossary
Getting Started
  • Setting Up Account Details
  • Default Business Hours
  • Understanding and Creating Teams
  • Inviting Team Members to the Platform
  • Roles and Permissions
  • Single Sign-On
  • Brands in SparrowDesk
  • Getting Started FAQs
  • Use a custom domain for your support portal
  • Customize Customer Email Notifications
Inbox
  • Understanding the Inbox in SparrowDesk
  • Managing Custom Views in Inbox
  • Live Chats in Inbox
  • Staying on Top of New Messages from Customers
  • Conversation Fields in SparrowDesk
  • Merging Conversations in SparrowDesk
  • Round Robin assignment explained
  • Export Conversations as CSV
  • Bulk update fields
  • Forward a Conversation to an External Contact
  • Common Email Delivery Errors
  • Add Watchers to a Conversation
Channels
  • Slack as a Channel
  • WhatsApp as a Channel
  • Setting Up Email as a Support ChannelConnect your custom email address How do I send and receive emails via SMTP and IMAP ? How do I find my SMTP/IMAP server address and port number? Common Errors while Connecting through SMTP/IMAPHow to Prevent Emails From Going to Spam Email Signatures
  • Installing Chat Widget Chat Widget Installation on WordPressInstall the Chat Widget on ShopifyCustomising Chat WidgetEmbedding and Configuring the SparrowDesk Chat WidgetChat Widget SettingsWhy End Users Don’t Always See Their Chat HistoryTrack page visits in SparrowDesk
Contacts
  • Contacts in SparrowDesk
  • How to manage contact segments
  • Deleting and Blocking Contacts in SparrowDesk
  • Contact Fields in SparrowDesk
Reports
  • Conversation Report
  • Team Performance Report
  • Understanding the AI Agent Report in SparrowDesk
  • Viewing CSAT reports in SparrowDesk
  • Reports FAQ
  • Exporting Reports as PDF
Automation
  • Macros
  • Business Hours
  • Service-Level Agreements (SLAs)
  • Setting up CSAT (Customer Satisfaction) in SparrowDesk
Zoona AI
  • AI Suggested replies in your Inbox
  • AI-Generated Chat Subjects
  • Zoona AI Knowledge Improvements
  • Introduction to AI AgentAI Agent - Configure PersonaTraining your AI AgentZoona AI Agent CommandsAI Agent - Deploying on chatAI Agent - Deploying on EmailHow to Create a Command Zoona AI Agent - FAQUnderstanding AI resolutions in SparrowDesk
Workflows
  • Automate repetitive tasks through Workflows
  • How to Create a Workflow
  • Workflow Blocks Library
Help Centre
  • Write Knowledge Articles for your Help Centre and AI Agents
  • Setting Up and Customizing Your Help Center
  • Use a Custom Domain for Your Help Center
  • Make Your Help Centre Discoverable in Search results
  • Adding Google Tag Manager to your Help Center
  • Creating a Ticket Form Setting up Customer Portal
Billing
  • How does SparrowDesk pricing work?
  • What is Seat ?
  • Manage your Billing and Invoices
  • About Sales Tax
  • How to cancel your subscription
  • Frequently Asked Questions
  • AI Co-pilot and AI Resolution billing
  • SparrowDesk Startup Program
Apps and Integrations
  • Okta Integration
  • HubSpot Integration
  • SurveySparrow Integration
  • Zapier Integration
  • Attio Integration
  • Linear Integration
  • Jira Integration
  • Gmail Integration
  • Notion Integration
  • Shopify Integration
  • Migrating from Freshdesk

Adding Google Tag Manager to your Help Center

Timer1 min read
SebinSebin

In SparrowDesk, you can add your Google Tag Manager ID once, and it will be included across all pages of your Help Center. This helps your team understand how visitors use your help content, which articles they view, and where they may need more support.


Before you begin

Make sure you have a Google Tag Manager ID.

Your ID usually looks like this:

GTM-XXXXXX

You can find this ID inside your Google Tag Manager account. See How

How to add your Google Tag Manager ID

screenshot-11_05, 10_06_37 am.jpg

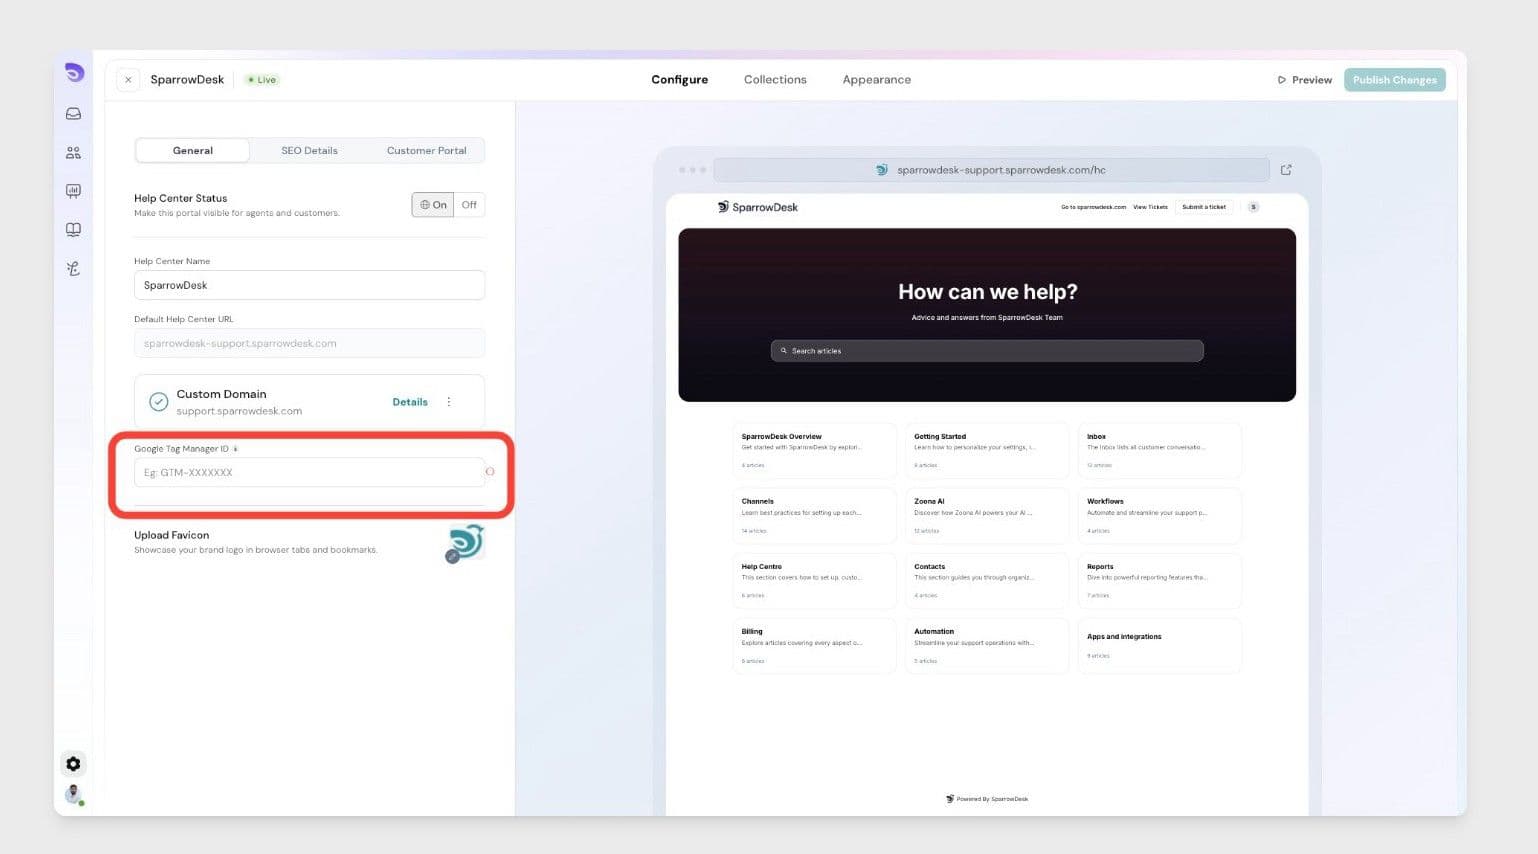
  1. Go to Settings in SparrowDesk.
  2. Open Help Center settings.
  3. Find the Google Tag Manager ID section.
  4. Enter your Google Tag Manager ID.
  5. Click Save.

Once saved, SparrowDesk will include Google Tag Manager across all pages of your Help Center.

What happens after you add it?

After the ID is added, you can manage your analytics setup from Google Tag Manager.

For example, you can use it to connect tools that help you understand:

  • Which Help Center articles customers visit
  • How visitors move through your Help Center
  • Which pages are most viewed
  • Where customers may need better help content

Need help finding your Google Tag Manager ID?

Open Google Tag Manager and select your container. Your container ID will appear near the top of the page and will usually start with GTM-.

screenshot-11_05, 10_27_58 am.jpg

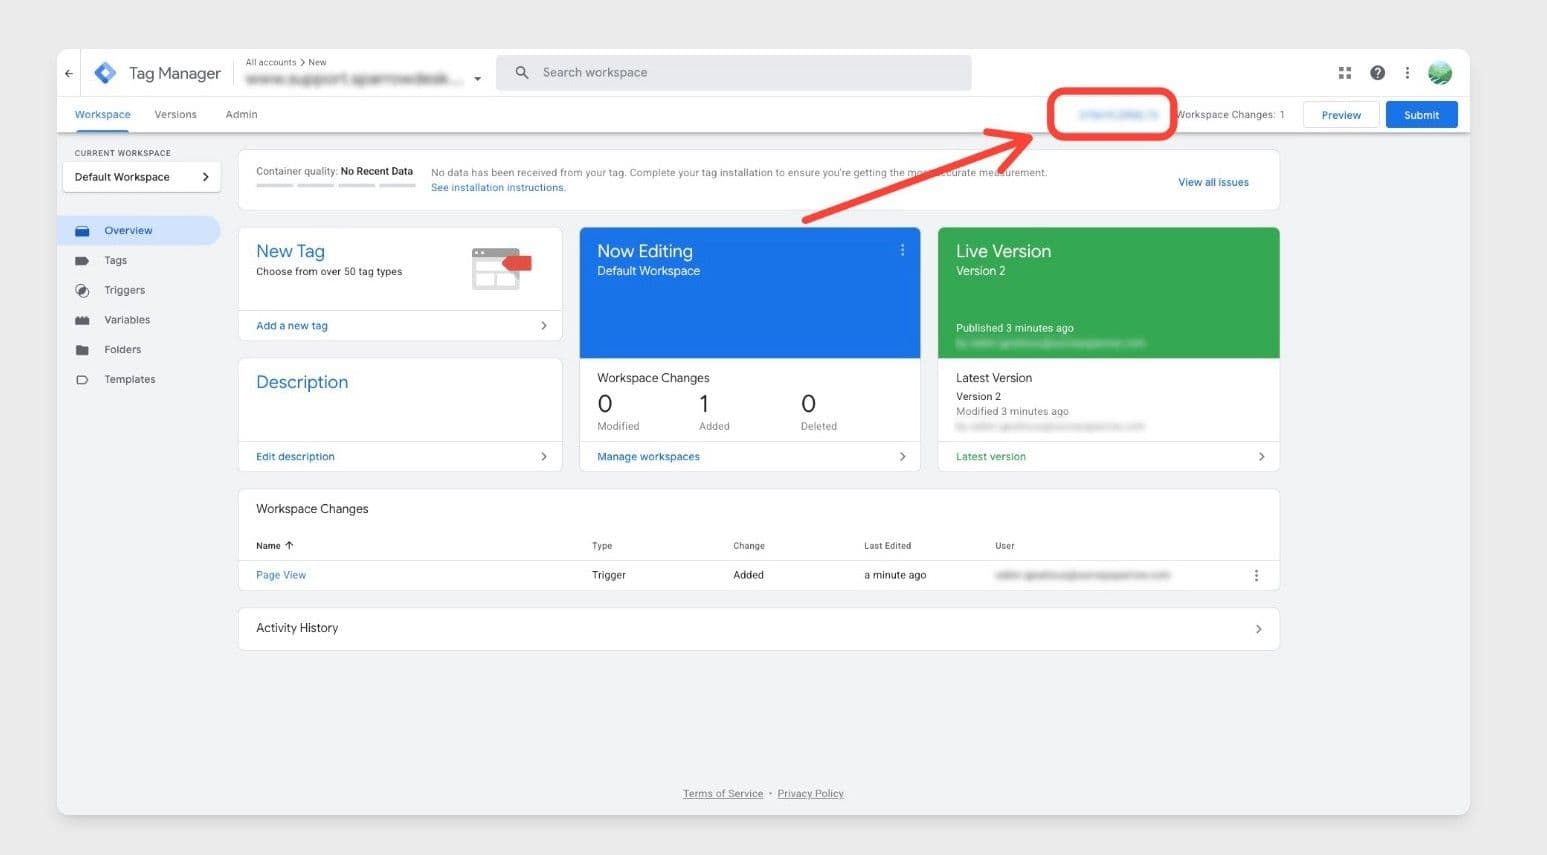
Copy that ID and paste it into the Google Tag Manager ID field in SparrowDesk.


Powered By SparrowDesk

Table of ContentsOn this page